Most countertop display problems trace back to one number that gets decided last instead of first: the footprint. A counter is the most contested real estate in the store, shared with a register, a card reader, a bag well, and whatever the retailer already put there. Get the width and depth right and the display earns its spot; get them wrong and a beautiful unit gets pushed to a back shelf or refused outright. This guide covers the sizes that actually show up on counters, the retailer tray standards that constrain them, and a method for sizing a display from the product out rather than guessing.
Start with a vocabulary check, because the format names carry size expectations. A PDQ tray (short for “pretty darn quick,” a shelf-ready tray you drop in place) is low and shallow. A counter dump bin is a deeper open box for grab-and-go product. A CDU (counter display unit) is any built-up structure, often tiered or with a header card. Each lives in a different size band, and picking the format is really picking a rough footprint before you refine it.
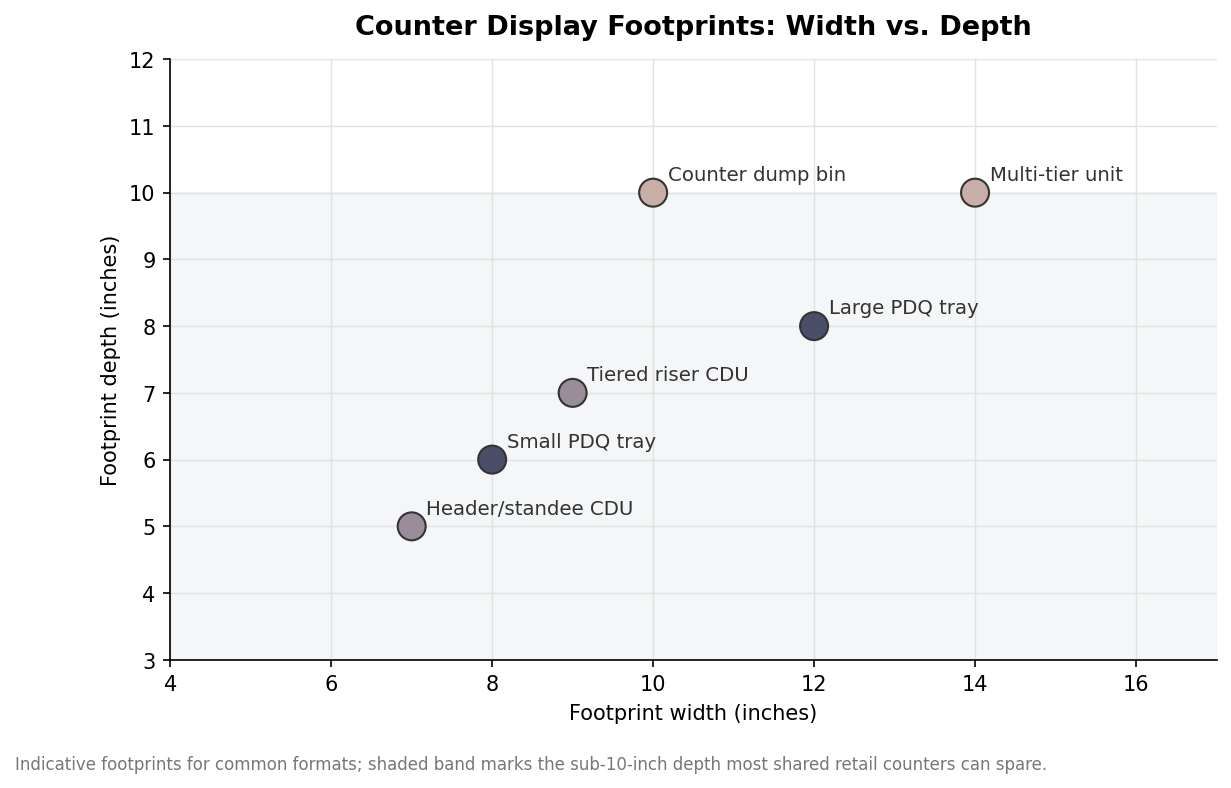
Common counter formats and their footprints
The workable range on a shared counter is narrower than people expect. Width has some freedom, commonly 7 to 14 inches, but depth is the scarce resource. Retail counters are often only 16 to 24 inches deep and half of that is already spoken for, so a display much deeper than 10 inches starts competing with the transaction zone and gets rejected. That is why the most accepted counter footprints cluster in the 8-to-12-inch-wide by 6-to-9-inch-deep range. Small PDQ trays sit at the shallow end for single facings of one product; tiered CDUs and multi-tier units use height rather than depth to hold more, keeping their footprint modest while stepping product up toward the shopper.
Material quietly caps how large a counter unit can go. Corrugated is light and cheap, so a bigger footprint stays inexpensive, but a tall corrugated unit with a small base can get tippy once product is loaded high, which argues for a wider base or a lower height. Acrylic and injection pieces are heavier and more expensive per square inch, which naturally pushes their footprints smaller and their designs more compact. Metal and wood units are heavier still and usually reserved for permanent placements rather than the temporary counter spots most brands are fighting for. Choosing the material early keeps the size ambitions realistic, because the same footprint costs and behaves very differently across these substrates.
PDQ and retailer tray standards
If the display is going into a major retailer, you do not get to choose the size freely. Chains publish shelf-ready and PDQ specifications that fix the outer tray dimensions to their planogram module, along with rules for how deep the tray front can be cut down for visibility, how the tray must pack into a case, and sometimes a maximum height for counter placement. The practical consequence is that the tray footprint is dictated by the case and shelf module, not by your product, so you design the product arrangement to fit the tray rather than the other way around. Always pull the current spec sheet for the specific retailer and program before designing, because these standards are revised and a display built to last year’s numbers can be turned away at the door. Treat any dimension you remember as a starting point to verify, not a fact to build on.
Sizing from the product out
For open-market displays where you set the size, work outward from the product. Measure the primary item in width, depth, and height, then decide how many facings across and how many rows deep you want visible. Multiply through, then add clearances: roughly an eighth to a quarter inch per side so product loads and pulls without binding, plus the wall thickness of the board itself. That last point catches people out. Corrugated is not zero-thickness: single-wall B-flute eats about an eighth of an inch per wall, C-flute a bit more, and double-wall BC around a quarter inch, so a display sized to the exact product footprint ends up too tight once the real walls exist. Add a header or riser height on top if the design carries branding above the product.
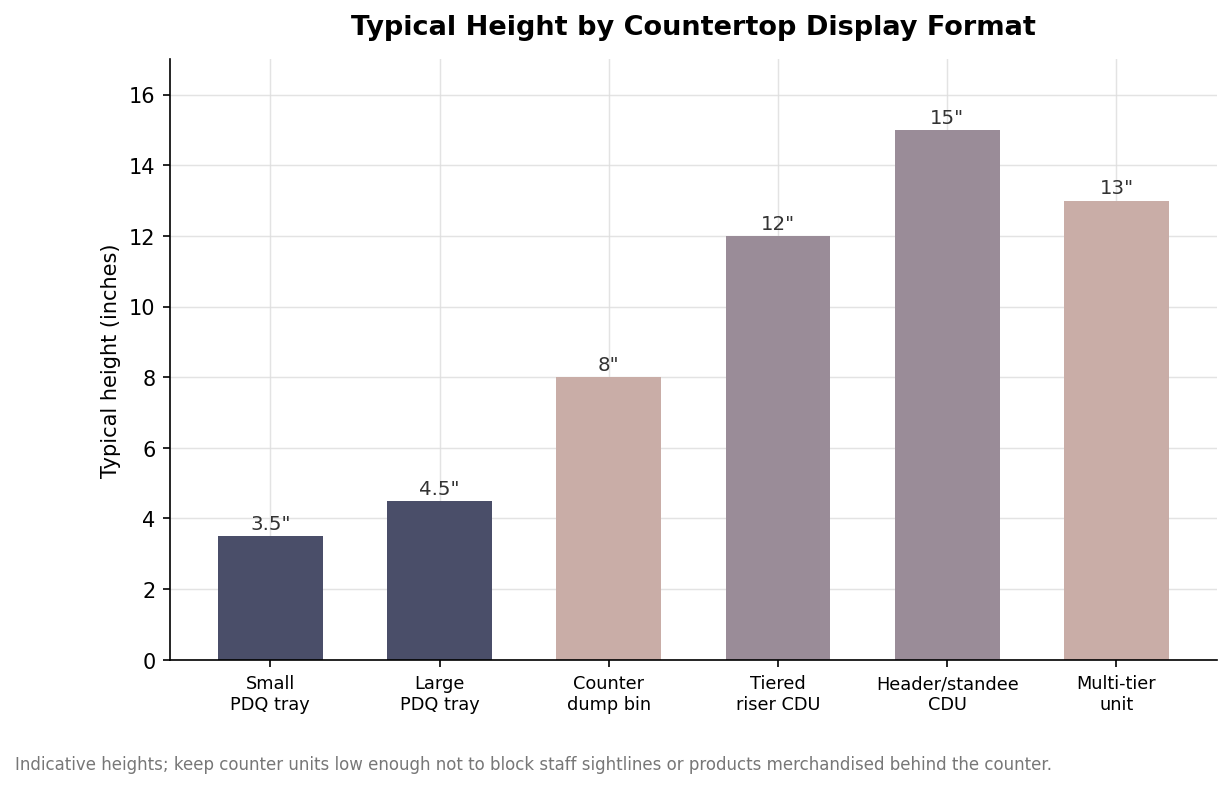
Height, sightlines, and counter reality
Height is where counter displays go wrong in the other direction. A unit tall enough to hold more product can block a cashier’s sightline, hide products merchandised behind the counter, or simply feel imposing in a small transaction space, and staff will move it. Impulse counter units generally live between 6 and 15 inches tall, with the taller end reserved for tiered structures whose footprint stays small. If height is doing real merchandising work, confirm it against the actual counter and the staff behind it rather than an empty desk in a design studio.
One more practical constraint ties footprint and height together: how the display ships and sets up. A unit that ships flat and folds up in a few seconds is far more likely to be deployed correctly and quickly than one that arrives assembled, fragile, and oversized. Sizing choices affect this directly, because a compact footprint and a sensible height pack more efficiently and survive transit better. Decide the footprint first, verify any retailer standard, size the structure from the product plus real clearances and board thickness, then sanity-check the height against a real counter. Do those four things in order and the display fits the space it was made for.
Leave a Reply