The question that decides whether a countertop display program succeeds is rarely which flute or which finish. It is a calendar question: will the units be on the counter by the day the promotion starts? Miss that date and even a beautiful display is worthless, or worse, triggers a retailer chargeback for a late delivery. This guide lays out how long custom countertop displays actually take, where the time goes, and how to work backward from your in-store date so the schedule works in your favor instead of against it.
The short answer, and why it is a range
For a custom corrugated countertop display, plan on roughly three to six weeks from approved artwork to delivered units. The spread is wide because a display is a manufactured object with several sequential steps, and any one of them can stretch. A simple tray reusing a known structure at the fast end of that window; a heavier, structurally engineered unit with premium graphics and a cross-country freight leg at the slow end. The single biggest variable is usually not the factory at all — it is how quickly proofs get approved and how print-ready the artwork is when it arrives. Treat three to six weeks as the planning band and pin down your own number by asking the supplier for a stage-by-stage schedule.
Where the time actually goes
It helps to see the job as a chain of stages rather than one lump of lead time. Structural design and CAD come first, turning your product, quantity, and counter space into a die line, which typically takes several business days. Then artwork and prepress, where your graphics are laid onto that die line and a proof goes out for sign-off — the approval loop here is where projects quietly lose a week if nobody is watching. Tooling follows: cutting the steel-rule die and making print plates, generally the longest single build step. Printing and lamination come next, and for litho-laminated units there is a hard, non-negotiable minimum of about 24 hours for the adhesive to cure before the sheets can be die-cut. Finally the units are die-cut, assembled or packed flat, and handed to freight. The timeline below shows how those stages stack up.
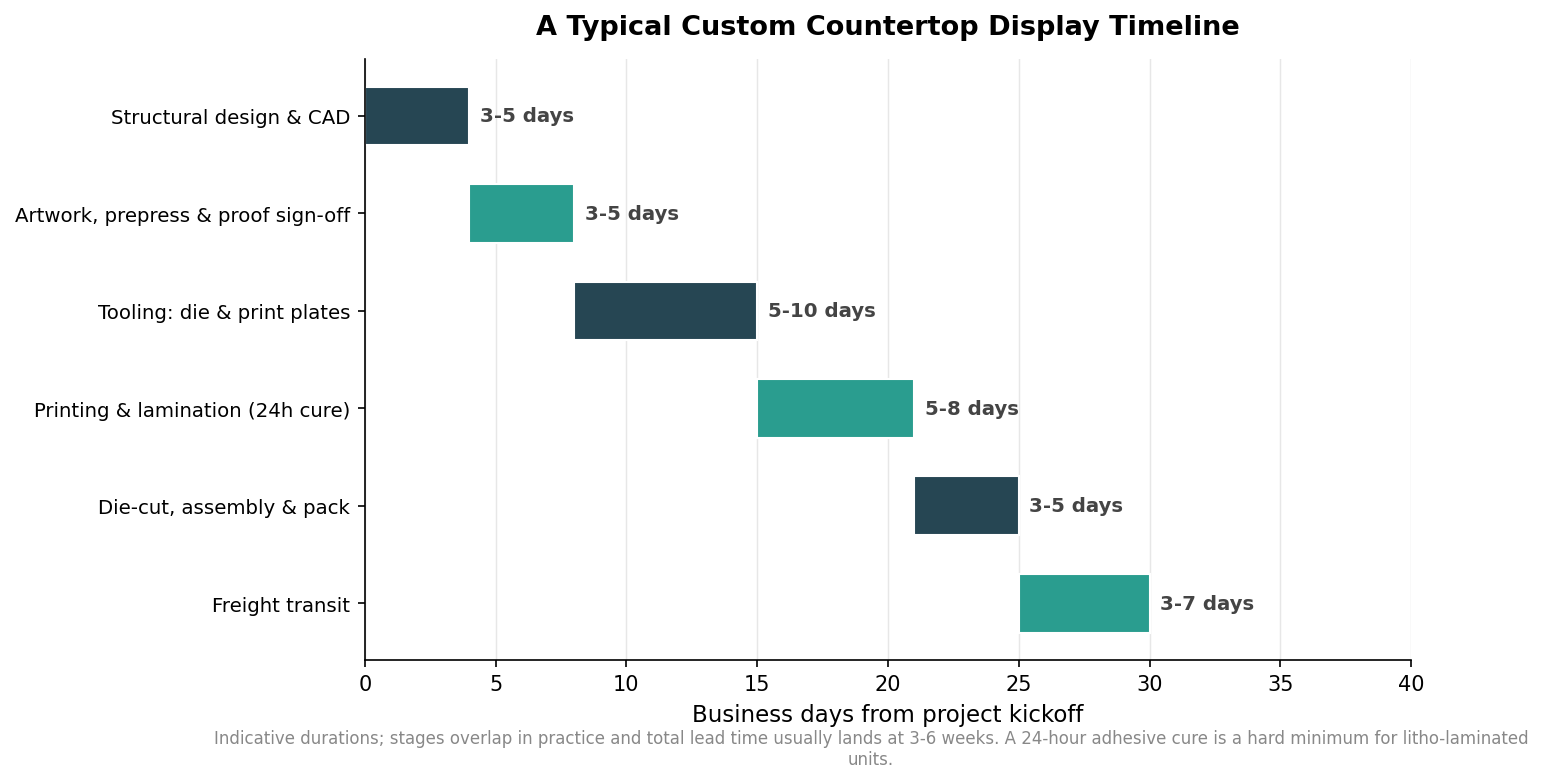
Two things on that chart matter most. The stages overlap in practice — prepress can start while structural details are finalized — so the real total is shorter than adding every bar end to end. And the durations are indicative: raw material availability, structural complexity, and the proof cycle can all move the finish line, which is why the honest answer is a band rather than a single date.
The print method changes the clock
How you print the graphics has a direct effect on both lead time and the order size that makes sense. Digital printing needs no plates, so it is the fastest to get moving and the natural pick for short runs, samples, and tests — at the cost of a higher price per unit once quantities climb. Flexo printing is efficient and quick once it is running, and its per-unit economics are strongest on high-volume programs, though it favors bold, simpler graphics over photographic detail. Litho-lamination delivers the sharpest, most photographic print but carries the highest setup and the longest lead time, so it earns its place on medium-to-high volumes where the premium look is worth the wait. The chart below maps each method to the run size where it fits best.
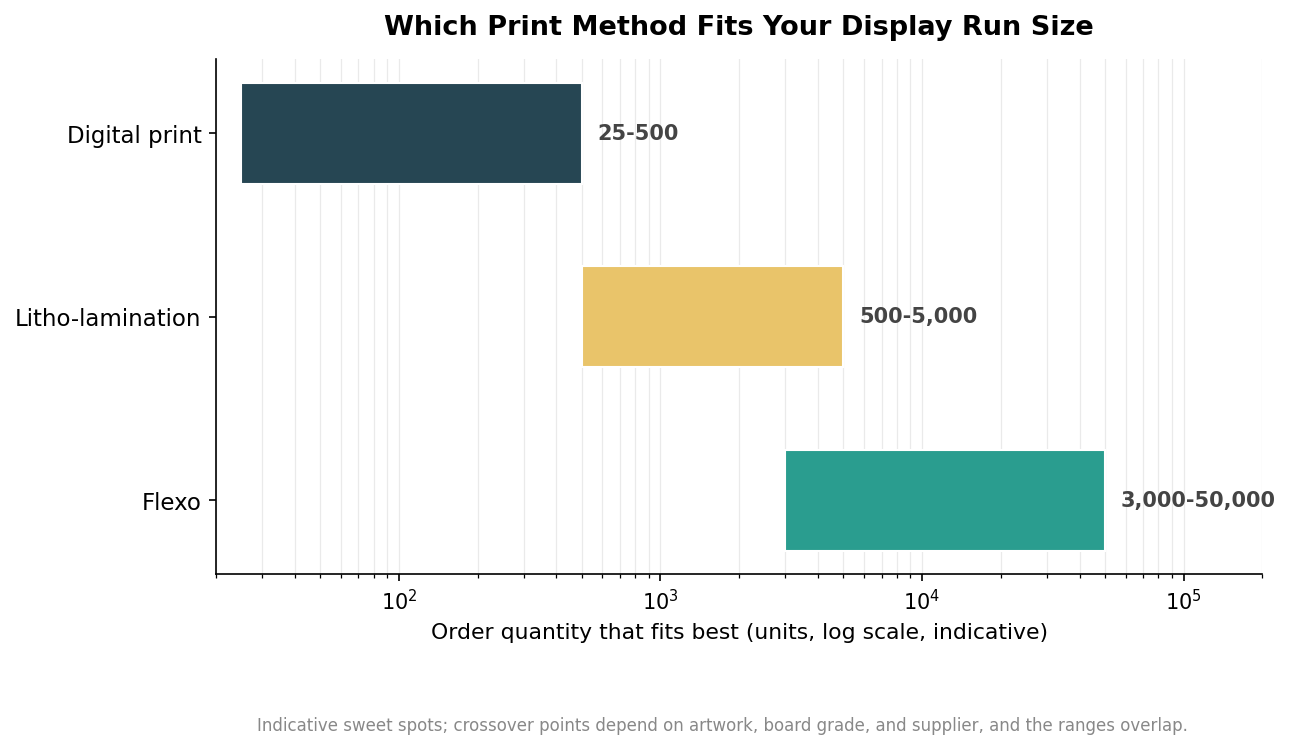
Read those ranges as overlapping guides, not walls. A mid-volume run of a couple thousand units can quote sensibly in more than one method, so the choice comes down to whether you are optimizing for speed, for photographic quality, or for the lowest possible unit cost at scale.
What makes a project run late
Almost every blown deadline traces back to the same handful of causes, and most are avoidable. Late proof approvals are the classic one — the factory cannot cut tooling against a proof nobody has signed. Artwork that is not print-ready, with low-resolution images, missing bleeds, or unconverted spot colors, sends the file back to prepress and restarts the clock. Structural revisions after the die is cut are expensive in both money and days. Trying to rush past the physical minimums, like the 24-hour adhesive cure, simply does not work no matter the rush fee. And freight is a stage in its own right: retailer delivery windows, appointment scheduling, and cross-country transit can add days that have nothing to do with how fast the display was built.
How to plan backward from your in-store date
The reliable way to hit a launch is to schedule in reverse. Start from the day the display must be live on the counter, subtract the freight transit time plus a safety buffer to get your ship-by date, then subtract the production, printing, tooling, and design stages to find the day you actually need to kick off. In practice that means starting the conversation six to eight weeks before an important drop rather than three, which turns the tight end of the range into breathing room. Lock your artwork and get it print-ready early, because that is the step most within your control. If this is a first run of a new structure, order a sample or prototype and build its turnaround into the plan. Above all, give the proof approval its own buffer and name who signs off, since a display that waits three days for a signature is a display that ships three days late. Plan the calendar with the same care you give the graphics, and the units will be standing on the counter the morning the promotion begins.
Leave a Reply